TORNADO Swirl Hat (needle knit converted to loom) tutorial/pattern, Free


tornadodone1
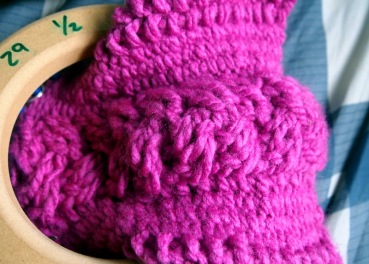
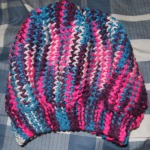
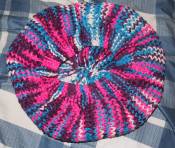
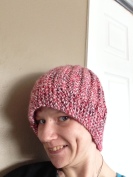
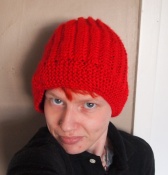
I found this pattern, called Swirl Hat (Ravelry link) on Rav and decided I wanted to make it on the loom. It’s super cute. I didn’t do the decreases for the top because I was being a bit lazy, but I converted the main pattern for the swirl, and knit that. I used my 72 peg Bufanda 3/8″ loom, and the pattern called for 72 stitches to be cast on. Any loom with a peg number that is a multiple of 8 will work, and I have a small head, so I recommend more pegs (or bigger gauge, peg spacing). Here’s how I did it.

What you need

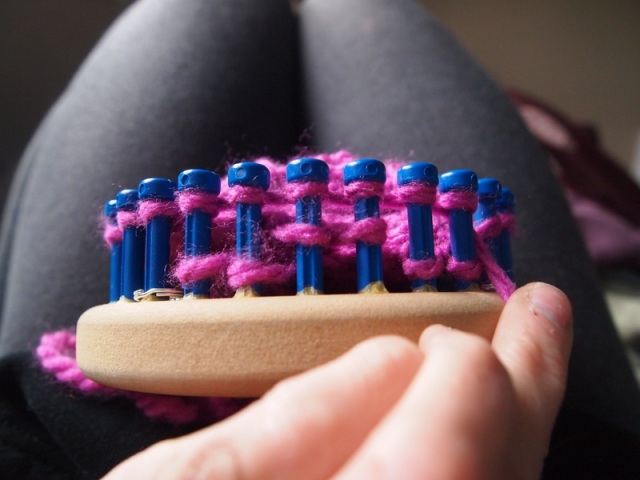
  • A loom with a peg count that is a multiple of 8. This pattern is worked in the round. I used 72 pegs.
  • Stitch markers for every 8th peg. I used 9.
  • About 100yds of yarn of your choice. I used worsted.
  • A tapestry needle and crochet hook.

I’d say this pattern is advanced beginner or intermediate due to moving pegs around.

Cast on a multiple of 8 pegs using the cast on of your choice and join in the round.

Place a stitch marker on every 8th peg (1, 8, 16, etc, and include the last peg before peg 1) This isn’t necessary, but it makes life easier.

tornadoagainBrim:

Row 1-8: Knit 1, Purl 1, all the way around
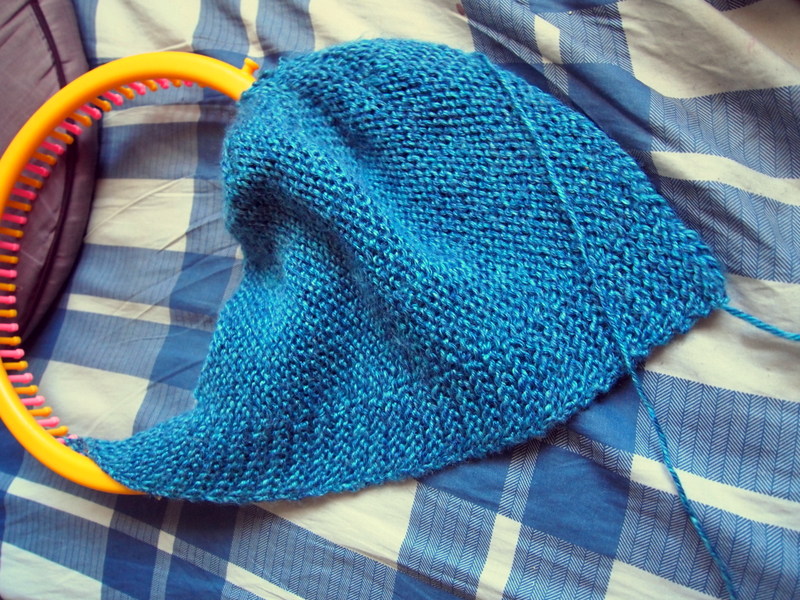
Body:

This uses 2 rows you repeat. I repeated them 25 times for a total of 50. My head is very small. A hat made on the 36 peg Knifty Knitter loom fits me perfectly. So I have a kid sized head.

jan14front
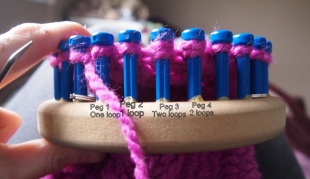
Row 1: K2, YO, K4, K2Tog (8 pegs) repeating all the way around. The stitch marker will be on the K2Tog (knit two together)

Row 2: Purl all

It takes a bit for the pattern to start showing.
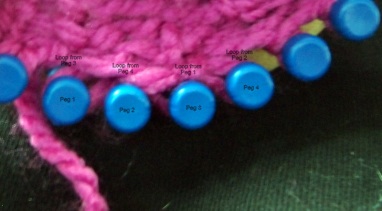


Row 1 Explanation

tornadoinstruct

A diagram of the 8 peg repeat in row 1

tornado-jan15
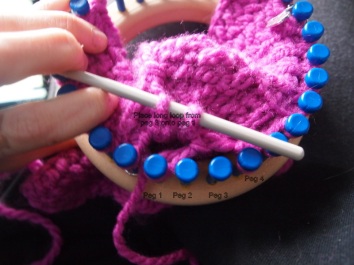
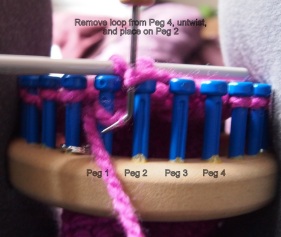
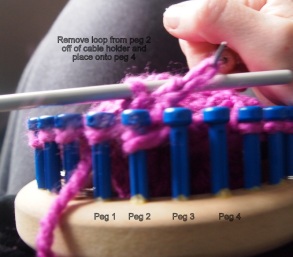
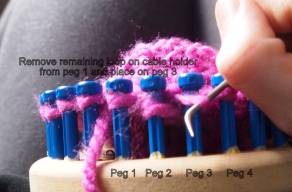
This involves moving pegs around. So here’s what you do:

  1. Move peg 7 to peg 9
  2. Move peg 6 to peg 7
  3. Move peg 5 to peg 6
  4. Move peg 4 to peg 5
  5. Move peg 3 to peg 4

Now, peg 8 will have 2 loops on it, and peg 3 will be empty. Knit the first two pegs, yarn over (bring the yarn in front of, but don’t wrap around) peg 3, knit the next 4 pegs, and knit peg 8’s two loops as it were one. Start again on the next 8 pegs.

tornado2.jpgRepeat rows 1&2 until the hat fits. I often just try it on, loom and all. Cast off using the gather/drawstring method. To do this, wrap the working yarn around the loom twice, and cut it from the skein, and attach it to a tapestry needle. Take the needle, and bring it up and through the loop on peg 1, and remove peg one from the peg. Repeat this on the rest of the pegs, until there are none left on the loom, and then tighten. Weave in your ends. There may be a small hole at the top of the hat, so take the tapestry needle and sew it together, and tie it off on the inside of the hat. Admire, you’re done!


Easy Mock Cables on a Knitting Loom


OLYMPUS DIGITAL CAMERA

4 cables over 6 pegs to make this nice looking cable in the centre of my infinity scarf.

I hated cables for the longest time. I knew how to do it, but I felt like I was going to break the pegs on my looms, no matter how loose I left the knit stitch to be cabled. I found an easier way of doing it that makes attractive looking chunky cables and is way easier, and you won’t break your pegs. I’m a pretty tight knitter myself, I use this technique all the time. The technique I’m showing you is worked over 6 pegs, but 4 at a time, and to do it in the other direction, just flip it horizontally. I’m making an infinity scarf.

You’ll need a cable holder (I use a size 6 crochet hook, you can use a pen, anything that will hold the loops) and a knitting tool. You always purl before and after the cabled pegs. So it would be Purl 2, Cable 1,2,3,4, knit 5, 6, purl 2. I put markers on my loom for this. This is just an example. It helps make the cable look nice. I’m showing the first part of the cable, which is done over pegs 1, 2, 3, and 4. The second part of the cable is done over pegs 3, 4, 5 and 6, using the same technique, to achieve this look.

OLYMPUS DIGITAL CAMERA

Your loom setup

To prepare for your cables, e-wrap (very important to use only the e-wrap) knit pegs 1&2, double knit (e-wrap twice, leaving 2 loops on the peg) 3&4 and e-wrap pegs 5 and 6. I set it up so peg 1 is on the left, and peg 6 is on the right.

OLYMPUS DIGITAL CAMERA

Loops on cable holder

Next, take the loops from peg’s 1& 2 and place them on your cable holder/crochet hook/whatever you’ve decided to use. Untwist the e-wrap’s so there is no twist in the stitch, and you’ll have an easier time of working the cables. Place the loop from peg 1 on first, and peg 2 on second, so when you go to move the stitches around, the stitch from peg 2 is moved first. I do this in a left to right direction, so peg 1 is on first, off last.

OLYMPUS DIGITAL CAMERA

Loops removed from peg 3

After this, you can set the cable holder down, or prop it up, whatever feels comfortable, and remove both loops from peg 3 and untwist, the same as you did before putting the other loops on the cable holder. You’ll have one long loop. This makes it much easier to move the loops from peg to peg, as they’ll be crossing over, to form the cable.

OLYMPUS DIGITAL CAMERA

Top view of peg 3 being placed across and onto peg 1

Now, take the (double loop) you just lifted off of peg 3 and place it onto peg 1. You may have to stretch it a little, it may be tight. I recommend using yarn with a lot of “bounce” for cables, and a loom that doesn’t have huge “caps” on each peg. I’m using a CinDwood loom in my example, which is perfect for cables. I find Knifty Knitter’s difficult, partly because of the “caps” and partly because the peg’s are further apart. I’m using 1/2″ spacing on my loom.

OLYMPUS DIGITAL CAMERA

Loop from peg 4 crossing over onto peg 2.

Now you do the same with Peg 4. Lift the double loop from the peg, and then place it onto Peg 2. This may need a bit more stretch, but you shouldn’t break your pegs. I always knit very loosely over cables. Peg’s 1 and 2 are still on the cable holder.

You’re now halfway there!

Now, take the loop on the right (the second loop you placed onto the cable holder, so from Peg 2) and remove it from the holder, and move the loop onto peg 4.

OLYMPUS DIGITAL CAMERA

3/4 of the way done! 

This can be very tight, so be careful. You may noticed the other loops tightening as well. Peg 3 will be empty with one peg left on the cable holder.

Now you have one remaining loop on the cable holder, which is the first loop you placed onto it, from peg 1.

OLYMPUS DIGITAL CAMERA

Final peg swap

Remove it from the cable holder, and put it onto peg 3. This is always the hardest loop to move, and you may have to use a bit of force. I always use my knitting tool for extra stretch. The pegs will usually break before the yarn does, yarn has super powers (I’ve noticed) but you shouldn’t have to tug that hard.

OLYMPUS DIGITAL CAMERA

Top view

This is your final time moving loops from peg to peg. Now you e-wrap knit the pegs, and knit the moved loops over the stitches. You’re finished your cables.

For the second part, I’ll keep it short. You set it up the same way. Knit peg’s 1 and 2, and you’ll be working 3, 4, 5 and 6. Peg’s 3&4 will have 2 loops on them. Take peg’s 5 and 6 and move them onto the cable holder (5 first, 6 second) and then move the large loop from peg 4 to peg 6, then move the large loop from peg 3 to peg 5. The hardest part is in this section, which requires tugging  lot, but move the loop from peg 6 to peg 4 off the cable holder, then remove the loop from peg 5 and place  it on peg 3. Knit all 4, and you’ve created your cable!

The next row you’ll be purling 2 before the 6 pegs for cables, knitting 2, double e-wrapping 2, knitting 2 (all e-wraps) and then purling 2 (or whatever the pattern calls for). That is setting up for the next cable. This is one way to create a cable pattern, and I love it.

OLYMPUS DIGITAL CAMERA

Finished!

Ribbed Sideways Toque (Beanie) Tutorial/Pattern By Me, and some more hats, on knitting looms


hat4OLYMPUS DIGITAL CAMERAOLYMPUS DIGITAL CAMERAvanilla1OLYMPUS DIGITAL CAMERA

I’ve been addicted to sideways hats for a big. This is when instead of making it on the round, you make it in short rows in wedges and seam together at the end. Above are 3 different hats, one is called Sidestreet ((the first and last pics) which is a pattern for $3.99 on Ravelry, the other is Vanilla on the Side (the second, third and fourth pics) which is a free, simple and fun pattern on Ravelry, and the final one is Sideways Beanie from the Big Book of Loom Knitting which is very simple and pretty fast.

OLYMPUS DIGITAL CAMERA

Sideways Toque: One wedge done

Now for my pattern

What you need: 1/2″ gauge loom with at least 30 pegs, or 3/8″ gauge loom with at least 40 pegs. I used the Spanish loom, the yellow one, with 82 pegs for the 3/8″ gauge, and for the 1/2″ I used the CinDwood 51 peg round loom. You can use a provisional cast on and off if you’d like, I used a crochet cast on, knitted bind off, and seamed it. Stitch markers are a good idea. This should be easy for a confident beginner to any level knitter.

This is not done in the round.

OLYMPUS DIGITAL CAMERA

7 wedges, before casting off

Definitions:

K: Knit (this pattern uses the e-wrap stitch, other stitches can be substituted, but the size will differ)

P: Purl

Sl: Slip a stitch (don’t knit that peg, done once every repeat)

PTMM: Purl up to and including  movable  marker

KTM: Knit up to but not including the marker on peg 6 (8)

W&T: Wrap and turn (lift the yarn off the peg, put the working yarn around it like a half stitch and place the original loop on top)

Cast on30 (40) pegs in your preferred choice, do not join in the roundA provisional cast on can be used for seamless bind offs, but you can cast on with the crochet (my preferred), e-wrap or double e-wrap. The first number is for the 1/2″ loom (30 pegs total) the second number is for the 3/8″ loom (40 pegs total)

Put stitch markers on peg 6 (8), 30 (20) and 38 (48)

OLYMPUS DIGITAL CAMERA

Finished toque (3/8″ used, 7 repeats)

Wedges

This is a wedge which  has 20 rows and will be repeated 7-10 times depending on the size of your head, loom and gauge. I used 7 wedges in my example.

Row 1: Sl 1, knit all

Row 2: K6 (8), PTMM W&T 29 (39)
Row 3: KTM, P6 (8)
Row 4: PTMM W&T 28 (38)
Row 5: Knit all
Row 6: K6 (8), P TMM W&T (27) 37
Row 7: KTM, P6 (8)
Row 8: PTMM W&T (26) 36
Row 9: Knit all
Row 10: K6 (8), PTM W&T (25) 35
Row 11: KTM, P6 (8)
Row 12: PTMM W&T (24) 34
Row 13: K all
Row 14: K6, P TMW&T (23) 33
Row 15: K, P6 (8)
Row 16: PTMM W&T (22) 32
Row 17: K all
Row 18: K6, PTMM W&T (21) 31
Row 19: K,TM P6 (8)
Row 20: P all

OLYMPUS DIGITAL CAMERA

OLYMPUS DIGITAL CAMERA

Repeat rows 1-20 7-10 times based on the size of your head. 

Cast off using the method of your choice. I used the knitted cast off then seamed up the back.

Wear, and share!

Some more kitty mitts.


kittensI love this fucking pattern book. It’s called “Kitten’s Lost Mittens”. I have a kitten (well, she just turned a year old on July 5th, but she’ll always be a baby kitty to me) named Mittens.  There are three patterns, one for a pair of fingerless mitts with a small thumb opening, one for a pair with an actual thumb, and then a full mitten. They’re made horizontally on a 3/8″ knitting loom, but the patterns can be adjusted for any size.

I have a Cottage Knitting Loom (link to the one I have) in 3/8″, and the set of Bufanda looms, (link to the store) which you can switch to 3/8″ spacing by putting in the extra pegs. Without the extra’s, they’re the same gauge and peg count as the Knifty Knitters, and with the pegs in, you get double as many, so up to 82 pegs at 3/8″.

IMG_0428

The cottage loom makes a smaller stitch due to the cotter pins, and I have a tendency to knit tight on it. My first mitts fit me fine, but I have small hands. It’s a great loom, though. The first pair were purple, out of Loops n’ Threads bubbly, which was a bit of a pain because of changing thickness and texture, but they look cool. I made a matching hat with a cable, too, and finished that skein.

IMG_0424

The pic to the right with the kitty (that’s Mittens The Kittens, her official title) guarding is a pair of Big Kitty Mitts. They have the full thumb. I’m learning a new bind off, called the Kitchener Bind Off, which is grafting the edges to leave no seam. I screwed it up on that pair, and ended up tearing it out and seaming it the good ol’ fashioned way, which is decent looking with these mitts because of the ribbing.  The pic to the left, is done with teal sparkle yarn, which is fun and very soft, those are Little Kitty Mitts because of the smaller thumb.

IMG_0427

The last picture is my first Big Kitty Mitt on my hand. They look so nice, I love the patterns.

So those are my mitts! I also made a pair in some blue variegated yarn that I was supposed to finish my first circle sweater with, but end up using it for everything else.

IMG_0440 IMG_0444

They’re big kitty mitts, and I did the grafting differently, but still following the instructions, and it came out not bad. I think its a helluva lot faster to just seam it with a tapestry needle, but I’m still new with the grafting. So, lot of mitts. You can see the seam in the one set of red-orange mitts, that was the attempted grafting. Oh well, nobody will notice other than me. I’m making these things for everyone! I’m thinking of some different patterns in different colours to knit onto them. Maybe a snowflake. I’ve never played with colour much! I’m no good at reading graphs, though. I’ll show you when they’re done. Go buy the booklet (linked in the picture) and have fun with the mitts!

OLYMPUS DIGITAL CAMERA

30 pegs of 118 on the Cottage Loom. Thumb finished, yarn is Loops n’ Threads Bubbly

A quick shot of the mitts on my loom for you to see, as well. The Bufanda looms are much nicer for these, though. CinDwood also changed the knitting tools/picks, and I was using my new one. I slipped and sliced my finger open with it! I love CinDwood everything but the new picks are a tad sharp, and I’m clumsy! Each pair took a good part of a day. So pretty quick, especially since I’ll be halfway done, and go online and surf for a while, or get a phone call and put my knitting down!

40 Row Super Comfy Chunky Cowl


I made this cowl in about an hour using super chunky wool.

OLYMPUS DIGITAL CAMERA

It’s really easy. Here are step by step directions.

I did this on the 41 peg Boye loom. I used very chunky yarn, e-wrap and purl stitches. A large gauge works better for this project,

E-wrap Cast on 41 pegs, but don’t join in the round yet. Half is done in a flat panel.

Knit 1 row
Purl 1 row
Do this 10 times (20 rows total)

Join in the round
Knit 1 row
Purl 1 row
Do this 10 times (20 rows total)

Bind off any way you choose. Add more rows if you aren’t using chunky yarn, or hold 2 strands as one.

Small baktus and my new loom set


I made a small baktus with my own pattern (really easy) and here it is. I also got one of the best ever Christmas presents from my mom, the Cindwood 4pc large loom bundle. Here are some pics of everything. I started the Dragon Tail scarf on one of my new looms, in purple.

OLYMPUS DIGITAL CAMERA OLYMPUS DIGITAL CAMERA OLYMPUS DIGITAL CAMERA


The baktus in progress, on half of the All n’ One Loom (I lost some parts when I moved apartments) The yarn is mohair and lace weight. I hardly used any, too. The spacing on that loom is 3/8″ and it came out fairly lacey. I don’t mind. It’s super soft. It did take a lot of extra yarn, because of the weight.

OLYMPUS DIGITAL CAMERA OLYMPUS DIGITAL CAMERA OLYMPUS DIGITAL CAMERA

The baktus complete, with me wearing it. The pattern is simple:

Cast on 3.

Knit’s go to the left, purls go to the right.

Purl 1

Knit 1

Purl 1

Knit 1 (Increase by 1 until the desired number of pegs are on, then do a couple rows, and start decreasing)

Cast off any way.


OLYMPUS DIGITAL CAMERA

The best Christmas present for a loom knitter! Aren’t they pretty?

What’s on my loom – Leafy Sea Dragon Scarf and a Lace Shawlette


I’ve been knitting the past few days, working on two projects. Get bored of one, work on the other, back and forth.

I found the Leafy sea Dragon scarf on Ravelry by a suggestion of a knitting loom group member. She recommended the pattern, and I had it on my harddrive, had never started it. Thought I needed a different style of wool, but it actually knits up quite nicely on the yarn I’m using – Value brand I got at Michael’s for $3.99 a skein. It’s about 3 feet long now. The yarn is pictured, and it was taken without a flash. I used about half a skein I had left and am working on finishing it with the 1/3 of the other skein I had.  I love this pattern! I’m going to keep going until I run out of yarn.

OLYMPUS DIGITAL CAMERA


Leafy Sea Dragon Scarf


OLYMPUS DIGITAL CAMERA


This is my other project, using a piece of the All n’ One loom. Parts of that loom got lost when I moved, and I can’t find everything to put it together, so I’m using just a side with 48 pegs. I’m making progress. It will be a simple shawlette (not using a pattern) or “baktus”, which is a triangular scarf done in garter stitch. The yarn I’m using is lace weight, so the 3/8″ pegs on the part of my poor All n’ One loom make decent sized stitches. That picture doesn’t even touch how nice the yarn is. I’m closed to being increased to 48 pegs, then I start decreasing.

My pattern is:

Cast on 3 pegs from left to right in any way you please. I used crochet.

Row 1: Slip stitch, purl to last peg, half stitch

Row 2: Slip stitch, knit to last peg, half stitch

Row 3: slip stitch, purl to last peg, half stitch

Row 4: Slip stitch, knit t last peg, increase by one (wrap the empty peg next to the last peg twice and knit over)

Repeat.

Simple eh? I can’t wait to see it finished. The yarn is gorgeous, yellows, oranges, reds and browns.

My leafy sea dragon scarf so far


I got this pattern from The Invisible Loom about a year ago and never got around to making it. Today I’m snowed in, so I’m watching House and knitting. Here it is so far. It’s about a foot long, and will probably take me all of the wool in that pattern that I have. Here are two in progress shots.

Snapshot_20141211 Snapshot_20141211_1

What a fun pattern!

9 Hat Project – 4 out of 9 hats finished, and I’ll teach you how to make them


I’ve got 4 hats finished, 3 done on the Knifty Knitter 36 peg loom and one done on the Boye 31 peg loom. I’m doing pretty good! I’ll show a pic of each and a short tutorial underneath it. I’ve got 5 to go, ones already on the loom (the second for the 31 peg loom) and I’m doing well! I might make more than nine, we’ll see. Or some gloves and socks. I’m using spare and scrap wool I found in my big container.

First, the garter stitch rainbow hat.

OLYMPUS DIGITAL CAMERA OLYMPUS DIGITAL CAMERA

This was a simple hat to make. I used the garter stitch shortcut and made it in about an hour. I didn’t like my cast on, so I knit 4 rows and made a mini brim that you can’t really see.

Basically, the entire hat is done in the garter stitch, and you can add a brim if you like. Gather bind off, sew the top together, done. All knits are e-wrap knits, and I did it on the 36 peg loom. It can be done on any loom.

Next, the purple and gray bumpy hat.

OLYMPUS DIGITAL CAMERA OLYMPUS DIGITAL CAMERA

This hat is a bit more complex and requires 2 different colours of yarn or wool.

All knits are e-wrap knits and this was done on the 36 peg loom.

I did the rib stitch for the brim, which is Knit 2, Purl 2 in the round, in the first colour (the gray). This works out well on the 36 peg loom, but if you’re using a loom with odd numbers, just knit or purl the last stitch. Whichever you prefer.

So, I did an e-wrap cast on and did the rib stitch (k2 p2) until I thought it was big enough.

Then I changed colour, and knit (e-wrap) one row so the colour change isn’t as noticable.

Then I purled 5 rows, and switched back to the first colour.

I knit 6 rows, in e-wrap, and then changed colour.

Go back and forth between colours, knitting 1 row and purling 5 for the second colour (which creates the bumps) and end on the first colour, knit 6, and gather bind off. You’re done!

Now for the diamond lace stitch hat done on the 36 peg loom. All knits are e-wrap knits and you can use any size round loom. I always knit my hats in the round.

OLYMPUS DIGITAL CAMERA OLYMPUS DIGITAL CAMERA

The colour is off in these photos, its a gray blue. It’s not as gray as the first one, and its not as blue as the second one.

Cast on in e-wrap and purl a row.

Then do the rib stitch (k2, p2 in the round) for as large as you want the brim to be.

The repeat for the pattern is knit one row, figure 8 stitch the next row, end on a knit row, and gather bind off.

The fourth hat is the first on the 31 peg loom, and has a pom-pom. It can also be made on any size loom.

OLYMPUS DIGITAL CAMERA

I don’t have a pic of me modelling it because its too small.

Knit about 12-14 rows and then fold the yarn up and make a brim.

Knit one row

Purl one row

Figure 8 stitch one row.

Repeat the knit, purl and figure 8 until it’s at the size you want it to be, and gather bind off and sew, add a pom pom if you’d like, and you’re done!

So those are my first four hats. Enjoy, and go knit!