
4 cables over 6 pegs to make this nice looking cable in the centre of my infinity scarf.
I hated cables for the longest time. I knew how to do it, but I felt like I was going to break the pegs on my looms, no matter how loose I left the knit stitch to be cabled. I found an easier way of doing it that makes attractive looking chunky cables and is way easier, and you won’t break your pegs. I’m a pretty tight knitter myself, I use this technique all the time. The technique I’m showing you is worked over 6 pegs, but 4 at a time, and to do it in the other direction, just flip it horizontally. I’m making an infinity scarf.
You’ll need a cable holder (I use a size 6 crochet hook, you can use a pen, anything that will hold the loops) and a knitting tool. You always purl before and after the cabled pegs. So it would be Purl 2, Cable 1,2,3,4, knit 5, 6, purl 2. I put markers on my loom for this. This is just an example. It helps make the cable look nice. I’m showing the first part of the cable, which is done over pegs 1, 2, 3, and 4. The second part of the cable is done over pegs 3, 4, 5 and 6, using the same technique, to achieve this look.

Your loom setup
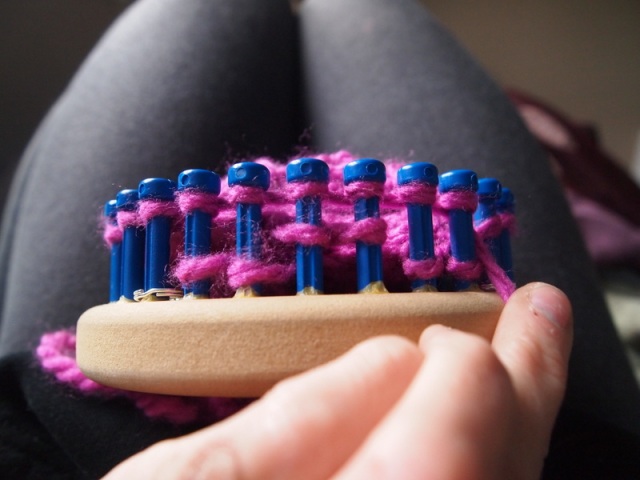
To prepare for your cables, e-wrap (very important to use only the e-wrap) knit pegs 1&2, double knit (e-wrap twice, leaving 2 loops on the peg) 3&4 and e-wrap pegs 5 and 6. I set it up so peg 1 is on the left, and peg 6 is on the right.

Loops on cable holder
Next, take the loops from peg’s 1& 2 and place them on your cable holder/crochet hook/whatever you’ve decided to use. Untwist the e-wrap’s so there is no twist in the stitch, and you’ll have an easier time of working the cables. Place the loop from peg 1 on first, and peg 2 on second, so when you go to move the stitches around, the stitch from peg 2 is moved first. I do this in a left to right direction, so peg 1 is on first, off last.

Loops removed from peg 3
After this, you can set the cable holder down, or prop it up, whatever feels comfortable, and remove both loops from peg 3 and untwist, the same as you did before putting the other loops on the cable holder. You’ll have one long loop. This makes it much easier to move the loops from peg to peg, as they’ll be crossing over, to form the cable.

Top view of peg 3 being placed across and onto peg 1
Now, take the (double loop) you just lifted off of peg 3 and place it onto peg 1. You may have to stretch it a little, it may be tight. I recommend using yarn with a lot of “bounce” for cables, and a loom that doesn’t have huge “caps” on each peg. I’m using a CinDwood loom in my example, which is perfect for cables. I find Knifty Knitter’s difficult, partly because of the “caps” and partly because the peg’s are further apart. I’m using 1/2″ spacing on my loom.

Loop from peg 4 crossing over onto peg 2.
Now you do the same with Peg 4. Lift the double loop from the peg, and then place it onto Peg 2. This may need a bit more stretch, but you shouldn’t break your pegs. I always knit very loosely over cables. Peg’s 1 and 2 are still on the cable holder.
You’re now halfway there!
Now, take the loop on the right (the second loop you placed onto the cable holder, so from Peg 2) and remove it from the holder, and move the loop onto peg 4.

3/4 of the way done!
This can be very tight, so be careful. You may noticed the other loops tightening as well. Peg 3 will be empty with one peg left on the cable holder.
Now you have one remaining loop on the cable holder, which is the first loop you placed onto it, from peg 1.

Final peg swap
Remove it from the cable holder, and put it onto peg 3. This is always the hardest loop to move, and you may have to use a bit of force. I always use my knitting tool for extra stretch. The pegs will usually break before the yarn does, yarn has super powers (I’ve noticed) but you shouldn’t have to tug that hard.

Top view
This is your final time moving loops from peg to peg. Now you e-wrap knit the pegs, and knit the moved loops over the stitches. You’re finished your cables.
For the second part, I’ll keep it short. You set it up the same way. Knit peg’s 1 and 2, and you’ll be working 3, 4, 5 and 6. Peg’s 3&4 will have 2 loops on them. Take peg’s 5 and 6 and move them onto the cable holder (5 first, 6 second) and then move the large loop from peg 4 to peg 6, then move the large loop from peg 3 to peg 5. The hardest part is in this section, which requires tugging lot, but move the loop from peg 6 to peg 4 off the cable holder, then remove the loop from peg 5 and place it on peg 3. Knit all 4, and you’ve created your cable!
The next row you’ll be purling 2 before the 6 pegs for cables, knitting 2, double e-wrapping 2, knitting 2 (all e-wraps) and then purling 2 (or whatever the pattern calls for). That is setting up for the next cable. This is one way to create a cable pattern, and I love it.
Finished!

You must be logged in to post a comment.